Mountains

Thumb Mountain To 9-5 Peak (拇指山 - 九五峰)

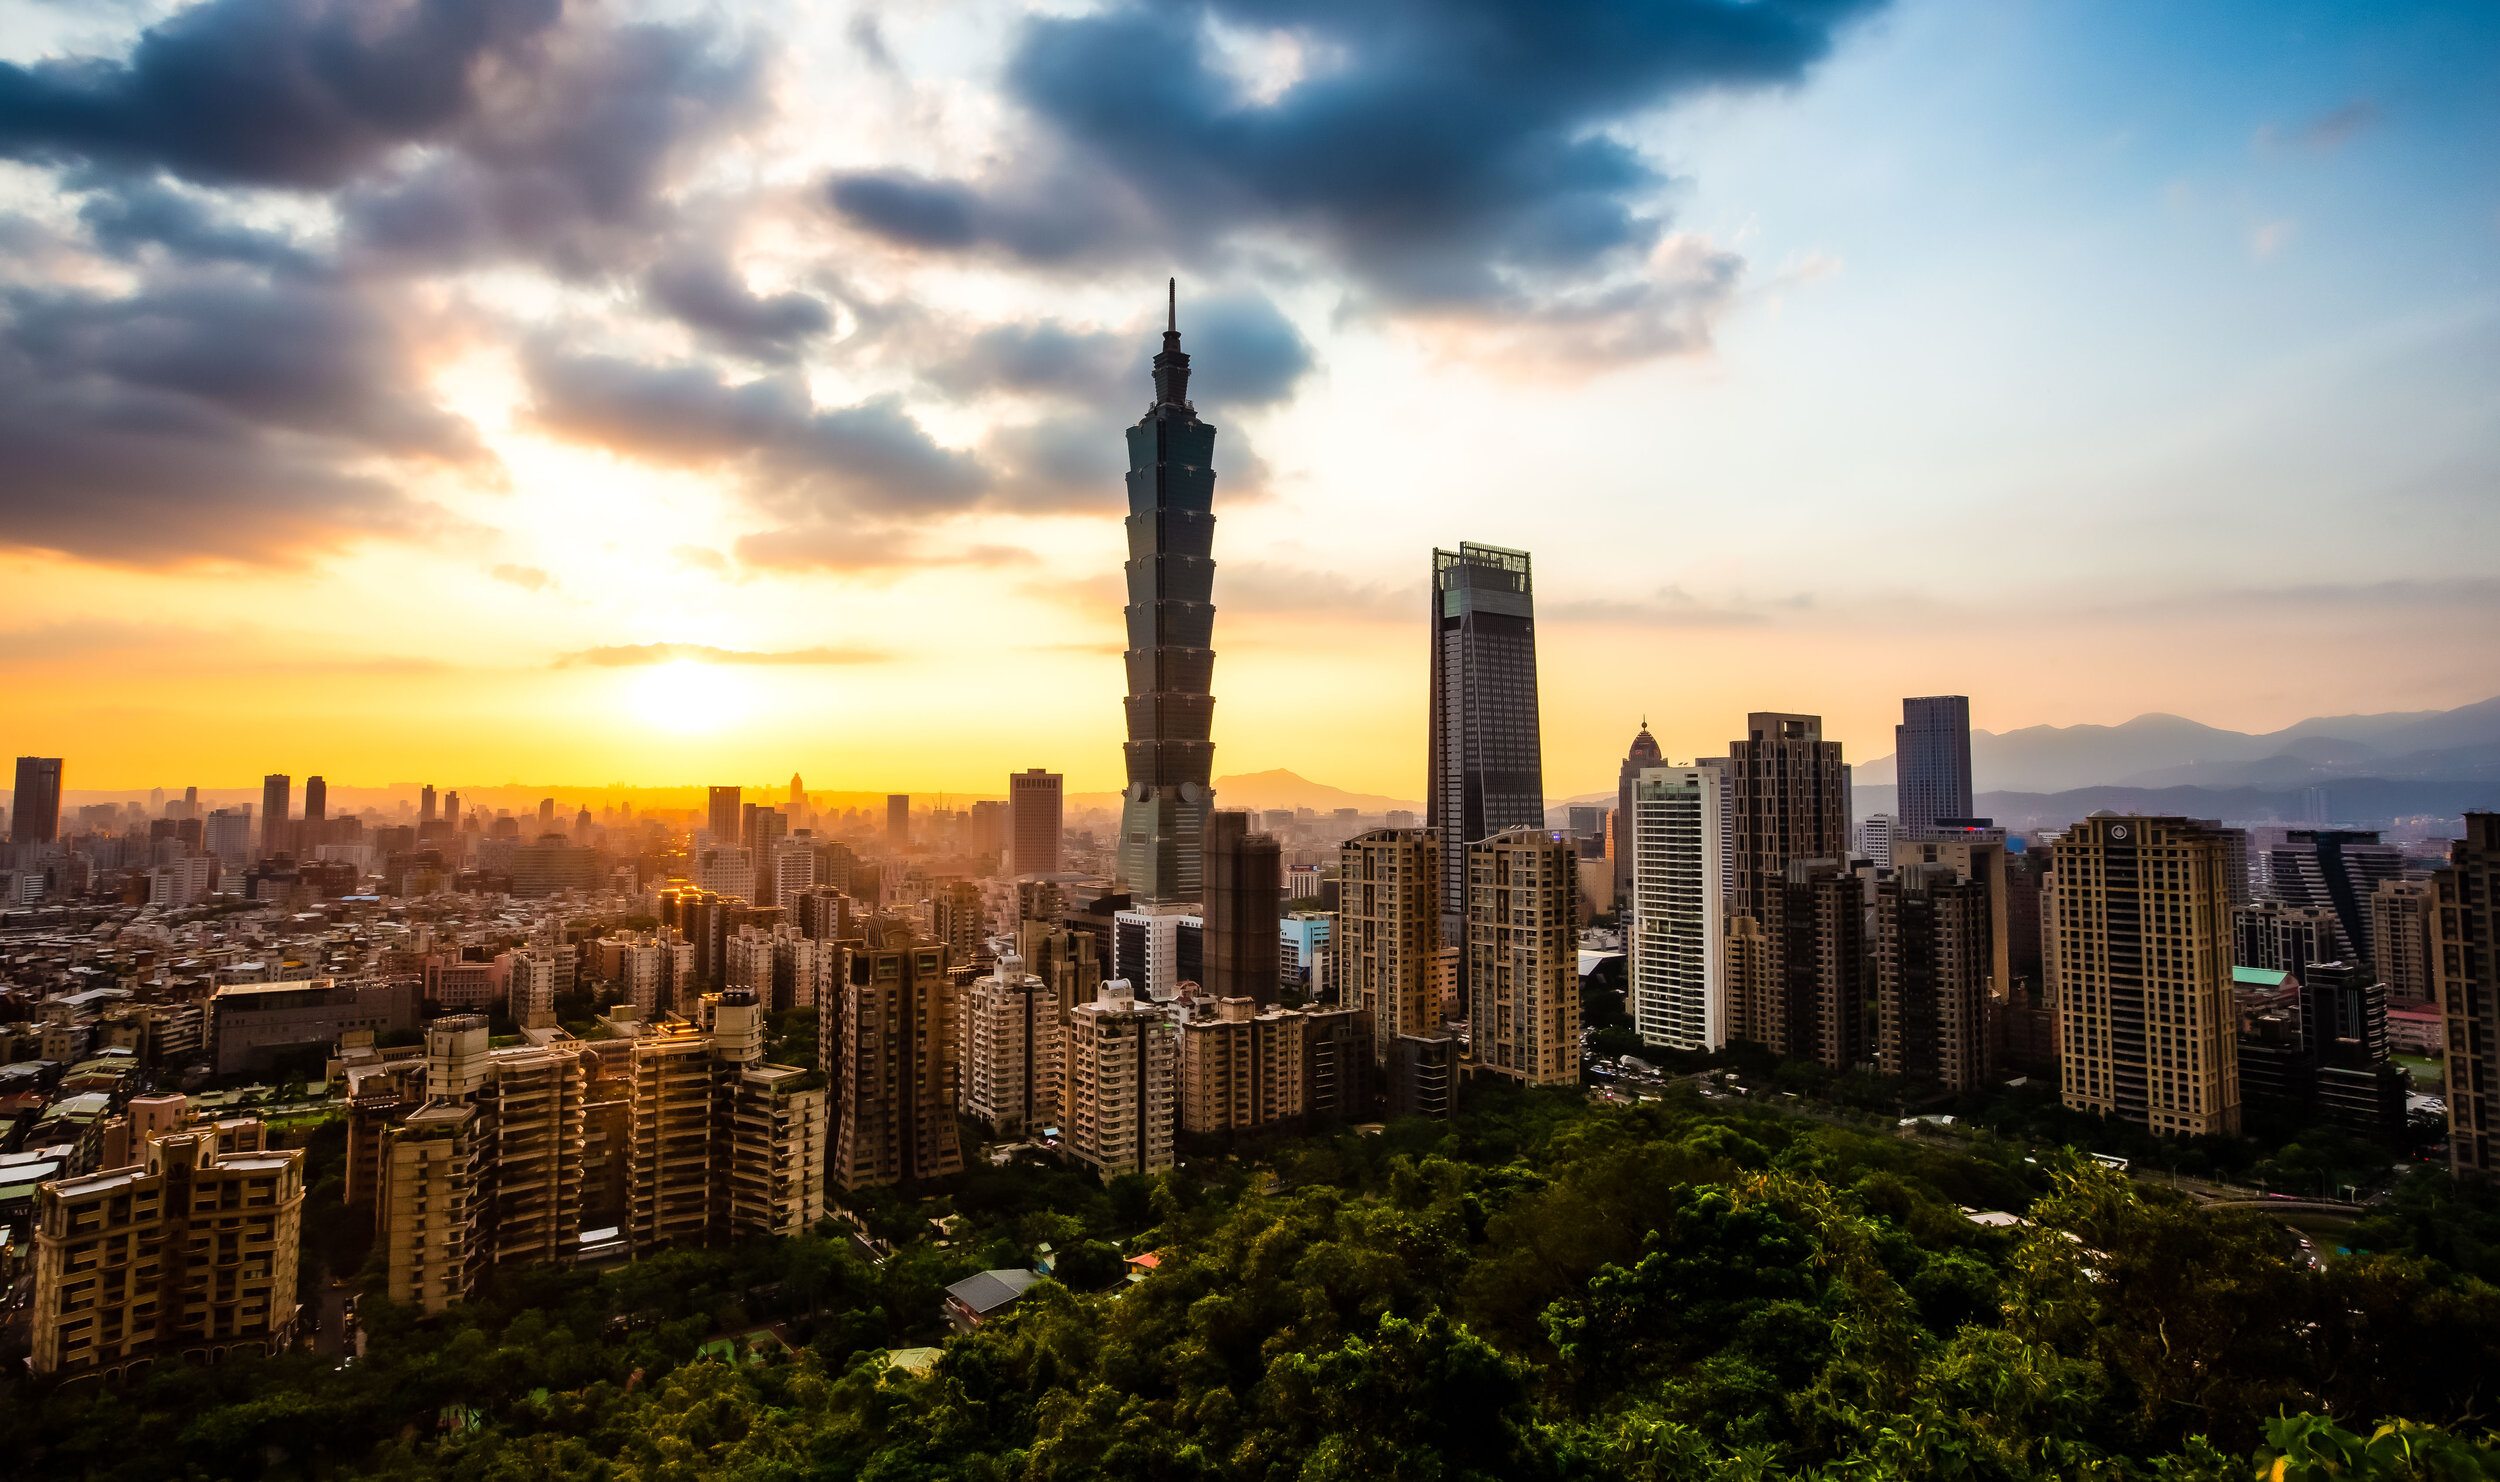
So, you’ve hiked Elephant Mountain, you’ve got your epic travel selfie and some beautiful pictures of the city. Now what? Are you going to head back down the trail and onto your next destination? Or are you going to keep following the trail to see what you’ll discover? 

If you’re like most tourists, you’re probably coming to enjoy the view from the peak of Elephant Mountain and then you’ll head back down to ground level without ever really questioning what amazing things are waiting to be discovered further up the trail. 

If you ask me, thats quite unfortunate. 

So, I’ll let you in on a little secret - You should keep hiking. 

With a little more time and effort you’ll be rewarded with the opportunity to enjoy the view of the city from a couple more mountain peaks and will have the chance to take some beautiful photos of the cityscape while you’re at it. 

The topic of today’s post, if you haven’t already figured it out, is Thumb Mountain (拇指山) and what is known as 9-5 Peak (九五峰), two mountain vistas that are a short distance from Elephant Mountain and are an absolute delight to visit, if you give them a chance. 

The two peaks are located within the same network of trails known as “Four Beasts Hiking Trail” (四獸山) which also includes Elephant Mountain, Tiger Mountain, Leopard Mountain and Lion Mountain. Thumb Mountain and 9-5 Peak however are located at the highest portion of the trail and tower above all the others.

One of the great things about this network of trails is the way that they are set up allowing you to easily summit several different mountain peaks, with only a small amount of time and effort. The trails are also really well-developed, well-marked, well-lit at night and also provide hikers with washroom and water filling stations at various points throughout the hike. 

So, if you’ve hiked Elephant Mountain and feel like continuing along the trail, I’ll share another secret with you - You’ve already hiked the most difficult part of the trail. If you decide to continue hiking to Thumb Mountain and 9-5 Peak, you’ll be able to enjoy a leisurely walk through a beautiful Taiwanese tropical forest and will be rewarded with even better views of the beautiful Taipei cityscape. 

Thumb Mountain (拇指山)

Measuring at 320 meters in height, Thumb Mountain is one of the highest points on the Nangang Mountain range. While standing on top of its beautiful rock face however, you’d be hard pressed to care about that as it is the only peak on the trail that actually gives off the impression that you’re on the peak of a mountain. 

So why is it called “Thumb Mountain?” 

Well that’s simple, because it (apparently) looks like a thumb.

I suppose when you’re walking up the smooth rock face to the peak of the mountain, you could imagine that you’re walking up the back of someone’s thumb, but when it comes to seeing images in rock formations, I’m lacking in imagination. I suppose I might feel differently if I was flying a drone and saw it from above but I’m not here to argue about that.

Considering how well-marked the network of trails is, it is a bit strange that when you arrive at the entrance to Thumb Mountain, there isn’t a sign that points you in in the direction of the peak.

I recall that there used to be a sign, so I asked one of the experienced hikers on the trail what happened to it and they explained that a typhoon blew it away and it has yet to be replaced. This probably means that that a lot of people have been passing by the peak without even noticing. 

The trail to the top of Thumb Mountain is an off-shoot from the main trail and if you’re like most people you may end up walking past the entrance if you’re not playing close attention. 

The best way to know if you’ve passed the entrance to the trail without noticing it is if you’ve arrived at a shrine that has been constructed within a rocky part of mountain face. The shrine is actually constructed at the trail level of the rocky Thumb Mountain crag and if you’re walking by you can’t miss it. 

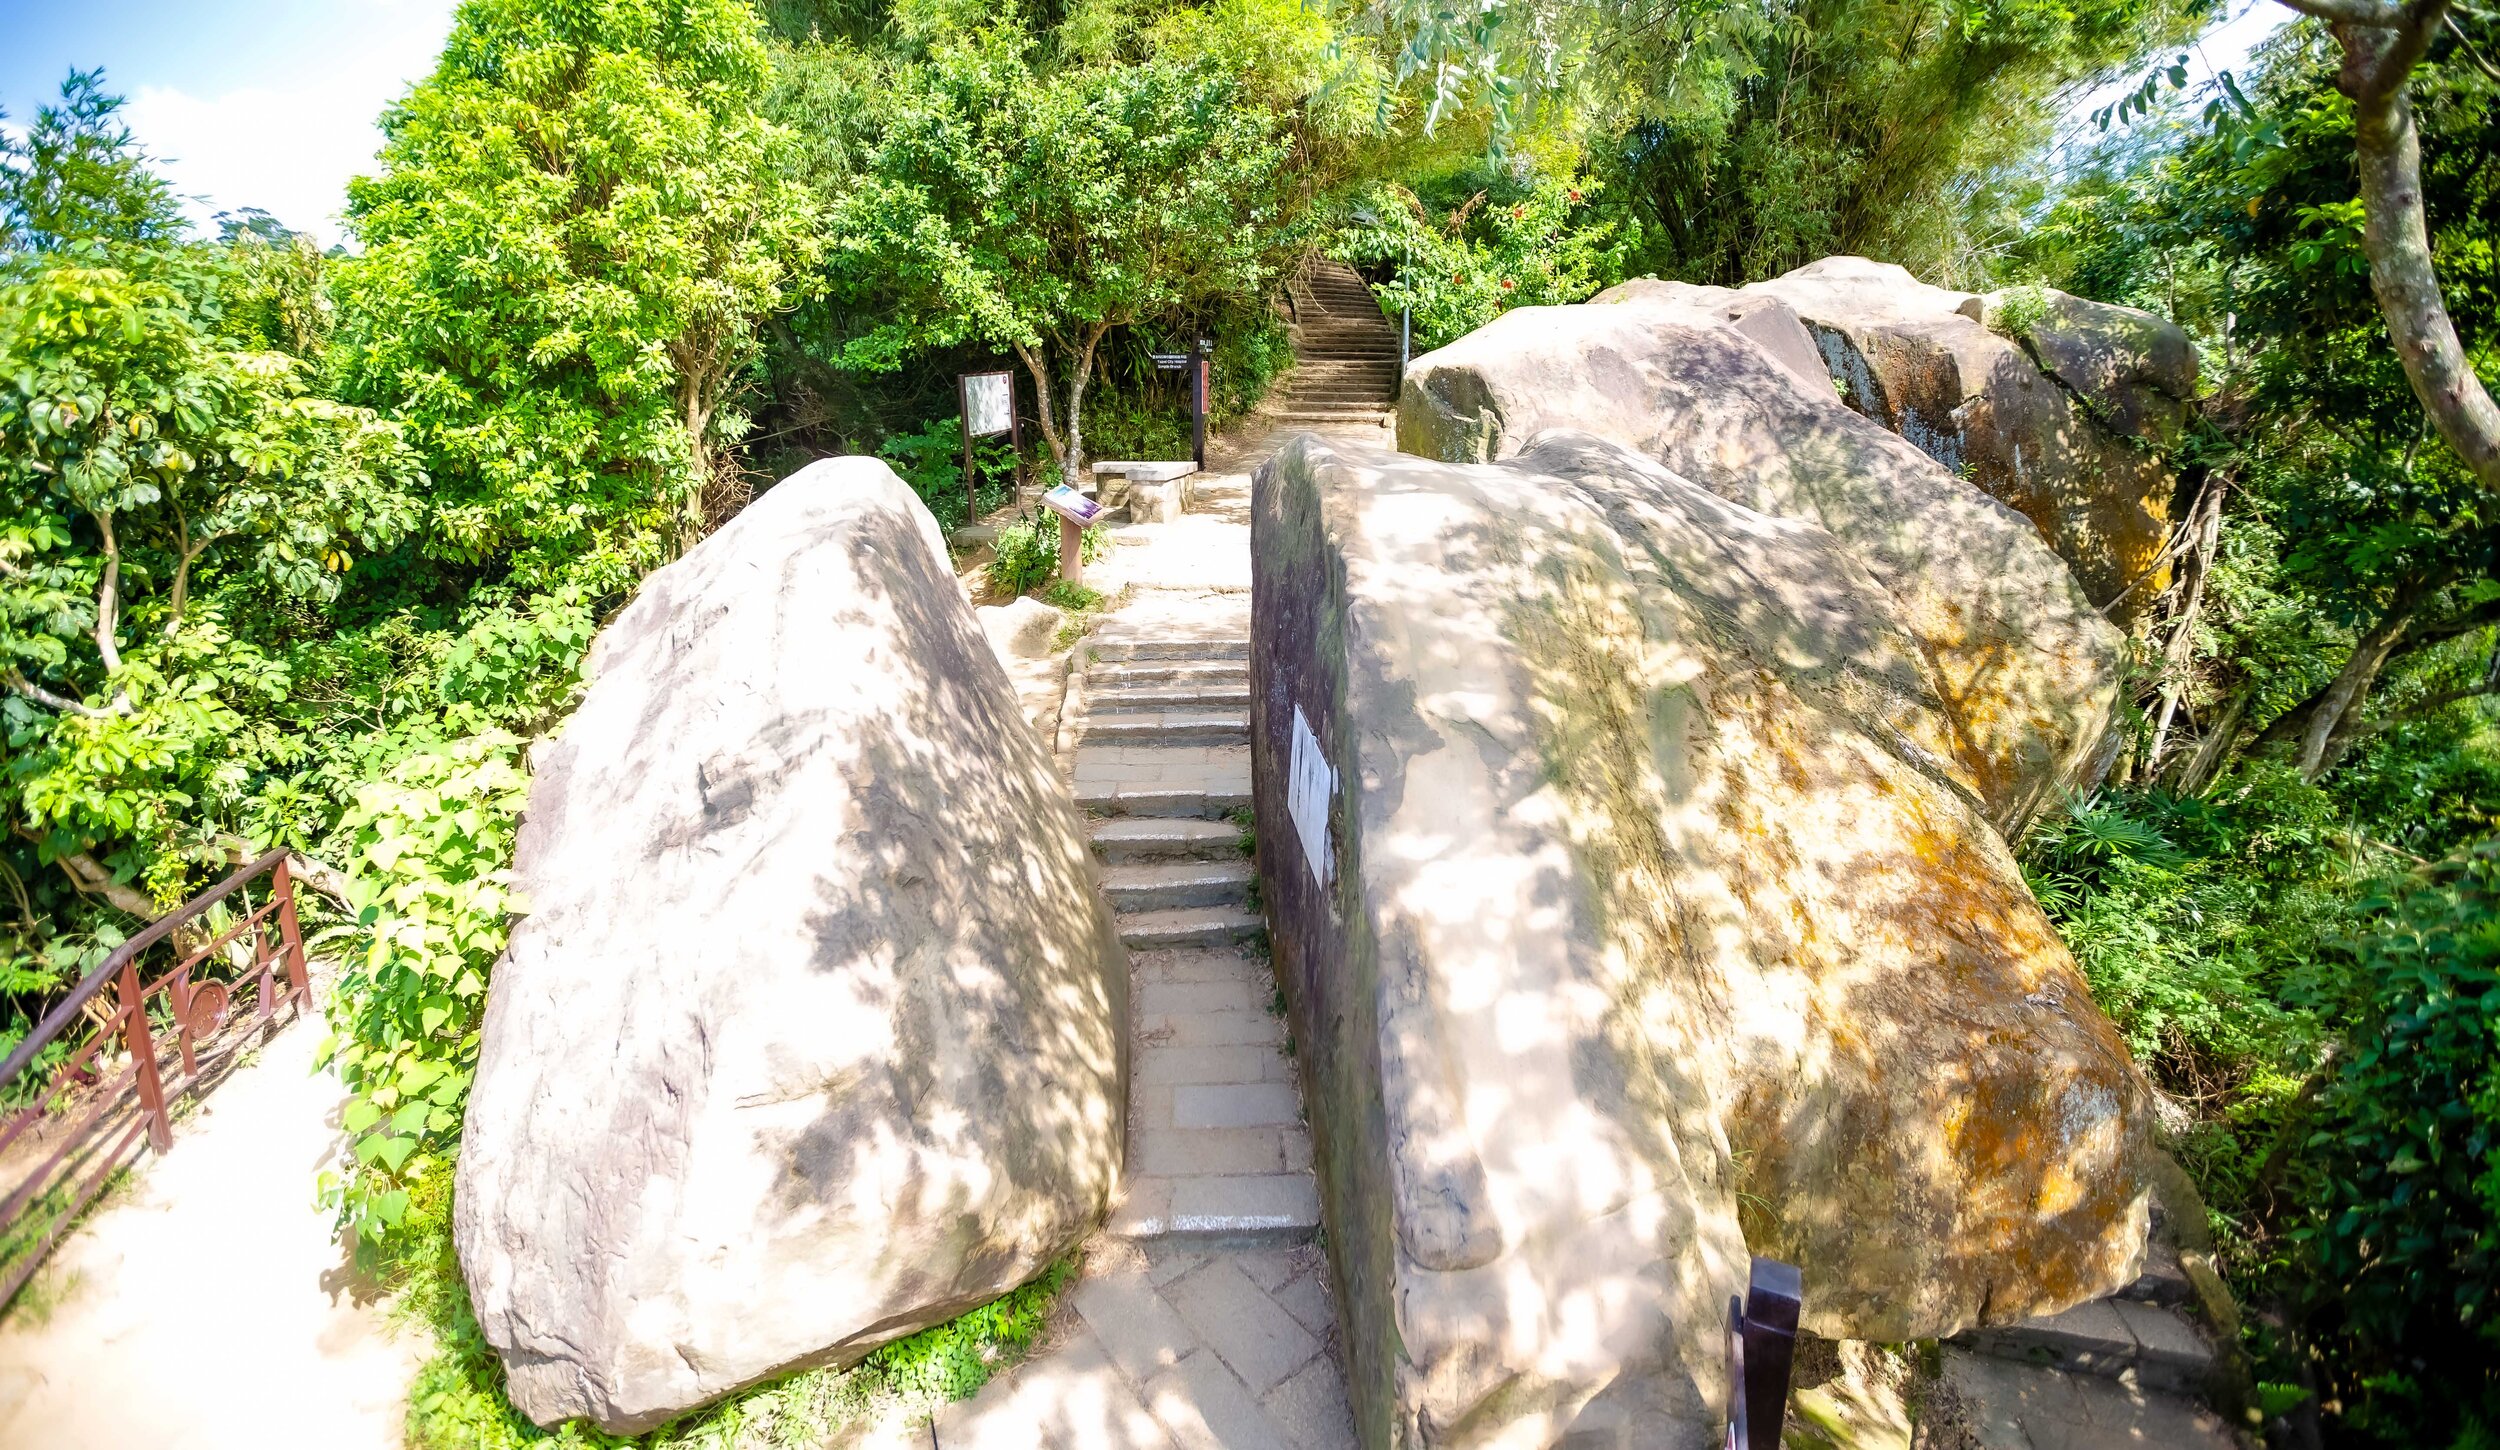
So, if you’re looking at the gods and goddesses, you’re going to have to backtrack until you reach a small clearing in the trail where you’ll find a set of stairs. As you walk up the trail to the mountain, you’ll notice that there are ropes fashioned to the side of the trail that are meant to help you safely get to the top.

Even though the trail isn’t that difficult to walk up, you’ll probably want to hold on just in case, especially when you’re on your way down as the trail can be a bit damp at certain times of the day.

From the trail to the peak of Thumb Mountain you’ll need little more than two or three minutes. 

As I mentioned above, the peak of Thumb Mountain is a rocky mountain face that is probably the most ‘peak-like’ experience you’re going to have on any of the mountains on the trail. The rocks are easy to walk up and once you get to the top there is a marker that indicates you’re on the peak of Thumb Mountain with the official height of the mountain.  

One of my favourite things about Thumb Mountain is that when you’re standing on top, you’re going to have beautiful 360 degree views of the Taipei cityscape as well as the Muzha district to your rear. You may even be able to see the Maokong Gondola in the distance if the weather is clear.

If you’re visiting on a hot day though, you are going to be completely exposed to the sun, so if you want to sit there for a bit to relax, you’re going to need to remember to protect yourself with a hat and sun screen. It also tends to be quite windy on the peak, so you’ll want to be careful when you’re walking around. 

The view from Thumb Mountain looks directly down at the city with only Elephant Mountain sitting between you and the cityscape. You should be able to take some really nice photos from here, but if you’re visiting on a hazy day, you might feel a bit disappointed as it could be difficult to get a clear photo.

Even if the weather seems really nice, if you are planning on hiking all the way to Thumb Mountain and 9-5 Peak, I recommend first checking the current Air Quality index which should give you an idea of how your photos will turn out.

Link: Air Pollution in Taiwan: Real-time Air Quality Index Visual Map

Nangang Mountain (南港山)

If you’re thinking, “Isn’t this blog titled Thumb Mountain and 9-5 Peak? Why is he talking about Nangang Mountain now?”, you’d be making a good point. But the truth is, if you’re hiking to both Thumb Mountain and 9-5 Peak, you’re going to pass by the peak of Nangang Mountain - whether you realize it or not. 

I always thought it was a little weird - “Nangang Mountain” (南港山) is the name for the mountain where you’ll find Elephant Mountain and Tiger Mountain but why are they referred to as mountains in both Chinese and English? Are they mountains or simply different peaks? 

The answer is simple, Nangang Mountain is the name of the mountain, which consists of several different peaks. The “peaks” started being referred to as “mountains” when the hiking trail became popular and people started realizing that the views of the city were beautiful.

GTJ-2019-0914-67.jpg

So is there such a thing as Elephant Mountain? Not really. Should it be renamed to Elephant Peak (象山峰)?

Nah. I don’t think so. Elephant Mountain sounds better.

The peak of Nangang Mountain receives little fanfare, mostly because there’s not really very much to see when you’re there. There’s just a simple marker on one side and a crane-like machine on the other. If you take a picture at the peak of Nangang Mountain, your friends and family on social media aren’t going to get very excited, because there isn’t really anything worth taking a photo of - its just a marker without a view.

And this is why we continue on to 9-5 Peak, where the view is fantastic.

9-5 Peak (九五峰)

For many years 9-5 Peak was an area of the trail that only experienced climbers would attempt to reach. Now though, people of all types can reach Nangang Mountain’s highest point through the well-developed network of trails.

At a height of 375 meters, 9-5 Peak offers visitors one of the best views in the whole city from its lookout. 

In the past, if you wanted to reach 9-5 Peak, you would have to scale up the dangerous mountain side making use of ropes that were fashioned to the rocks. Not only was this too difficult for most people, it also caused quite a few accidents and injuries.

In 2014 for example, a young women lost her grip, fell a hundred meters and died. 

While the ropes still exist and you can still try your hand at using them to climb up the mountain, the city government has made the whole process a lot easier by connecting trails on several different sides of the mountain that allow you to reach the peak. There are currently warning signs that caution hikers of the danger of climbing the mountain side and it seems like the local government is in the process of removing them entirely. 

You might be wondering why all the other peaks on the mountains have relatively normal names while this one is oddly named 9-5 Peak - The name is surprisingly fitting and is meant to pay homepage to an avid hiker who (several decades ago) successfully climbed the mountain at the age of 95.

The name 9-5 Peak (九五峰) is dedicated to Mr. Yang Sen (楊森) who to the surprise of many was able to successfully climb to the peak of Nangang Mountain. Given the difficultly of hiking the mountain several decades ago, it was considered quite a feat for a man of his age to complete the hike, so they renamed the peak in his honour. 

The peak is famously home to a giant rock that people often climb on top of to take photos. The front side of the rock features the Chinese characters “九五峰” etched into the side indicating that you’ve reached the highest point of the mountain. 

The reason why I think the name of the peak continues to be fitting is because the majority of the people you’re going to find on the peak are the elderly retirees of Taipei who hike the trail on a daily basis for a bit of exercise and to meet up with their friends.

When you’ve arrived at the peak, you’ll probably notice that there is a sense of community up there with most of the people stopping to have a chat with their fellow hikers, who are people they see almost on weekly or daily basis.

When I first hiked to the peak over a decade ago, sitting on top of the rock, especially at night provided excellent, even romantic views of the city. Today though, the view from the top of the rock has mostly been obscured by trees and brush that has grown a little too high.

You would think that with such a great view that people would want the trees obscuring the view to be removed, but that isn’t really the Taiwan way. People here wouldn’t support the natural environment being destroyed for something as unimportant as an epic view of the cityscape.

Thankfully, there is an even better lookout a short distance away from the peak where you’re afforded panoramic shots of the Taipei cityscape high above the rest of the mountain range. The 9-5 Peak Lookout is probably the best photo-taking spot on the whole trail and hiking the extra hour or so that it takes to get there is well worth the effort thanks to the spectacular photos you’ll come away with.

Getting There

Route Map for Thumb Mountain and 9-5 peak www.goteamjosh.com/blog/thumbnine

How you get to these two peaks really depends on where you’re starting your hike - In this case, we’re spoiled with several different options, so when you’re planning your hike, your most important consideration is going to be what route you want to take and what you want to see along the way. 

I may just be guessing here, but I would assume most short-term tourists are likely to start on the Elephant Mountain side, while local people or long-term travellers (like myself) are more likely to start on the Tiger Mountain side. 

There are pros and cons to each of these starting points, so let me introduce the different routes you can take and the walking method for each. 

Route 1 - Elephant Mountain - 9-5 Peak

What is likely to be the most popular route for tourists is to start hiking at the Elephant Mountain trailhead, completing that trail and then making your way from there to Thumb Mountain and then onto 9-5 Peak. This route might seem like it is the most convenient due to the fact that its close to an MRT station and allows you to first enjoy the beauty of Elephant Mountain.

You will however have to deal with a much steeper climb as well as a much more crowded trail for the first section of the hike.

If you’re a short-term tourist visiting Taipei, hiking this route combines a visit to Elephant Mountain and allows you to travel a bit further than most other tourists do. 

The thing is though, I’m not exaggerating when I say that the Elephant Mountain trail is quite steep and there is a section of the route that takes you to Thumb Mountain that is also quite steep.

There are better options if you’re worried about wearing yourself out on the hike.

Route 2 - Tiger Mountain - Thumb Mountain

Another option would be to take the MRT to either Houshanpi Station (後山埤捷運站) or Yongchun Station (永春捷運站) and walk to the Tiger Mountain (虎山) trailhead. From there you’ll continue your hike from the peak of Tiger Mountain to 9-5 and Thumb Mountain and then leaving from Elephant Mountain.

If you elect to take this route, you’re in for a much easier hike with a fraction of the traffic on the trail and you’ll also get to enjoy the beautiful view from Tiger Mountain as well! 

This route requires a 10-15 minute walk from the MRT station to the trailhead but you’ll save time on the actual trail as the distance to 9-5 and Thumb Mountain is much shorter than the route from Elephant Mountain. 

There are several different trailheads for Tiger Mountain, but the closest and easiest to get to from the MRT station or by Youbike are the two trailheads on Songshan Road (松山路). You’ll find them both on the map above.

Route 3 - Songshan Cihui Temple - Thumb Mountain 

Let’s say you’re a pro and you’ve hiked Elephant Mountain and Tiger Mountain a bunch of times and have little interest in hiking them again. Can you still hike to these two mountains while avoiding the others? Sure. You’ll have to keep in mind though that even though there are a number of trails in this mountain network, they all eventually meet up at some point and allow easy access to all the other peaks. 

If you prefer to hike this route, simply take the MRT to either Houshanpi Station (後山埤捷運站) or Yongchun Station (永春捷運站) and then make your way to the beautiful Songshan Cihui Temple (松山慈惠宮) where you’ll find the trailhead at the rear of the building. 

This route will take you around Tiger Mountain and directly to 9-5 Peak where you’ll be able to continue along the trail passing by the peak of Nangang Mountain (南港山) before arriving at Thumb Mountain (拇指山). From there you can either leave the way you came or head down the mountain passing by Elephant Mountain and finishing at the Xiangshan MRT station.

If you want to save a bit of time walking, you could also take one of the various buses that travel through the area. If you take the bus, get off at the Fengtian Temple (奉天宮) stop and then walk up the hill to the temple from there.

If you need info on bus stops or real time info, check the Taipei eBus website for more information. You may also want to download the “台北等公車” smart phone app which uses GPS to let you map your route more easily.

Buses that serve the Fengtian Temple Stop: #46, #88, #207, #257, #286, BL10.

Something that I’ve always questioned in regard to the majority of tourists hiking Elephant Mountain is whether they were only hiking the mountain for a selfie halfway up or if they were just completely unaware of the existence of Thumb Mountain and 9-5 Peak. I suppose you can’t blame most people, these two peaks aren’t really all that well advertised, and thats a shame.

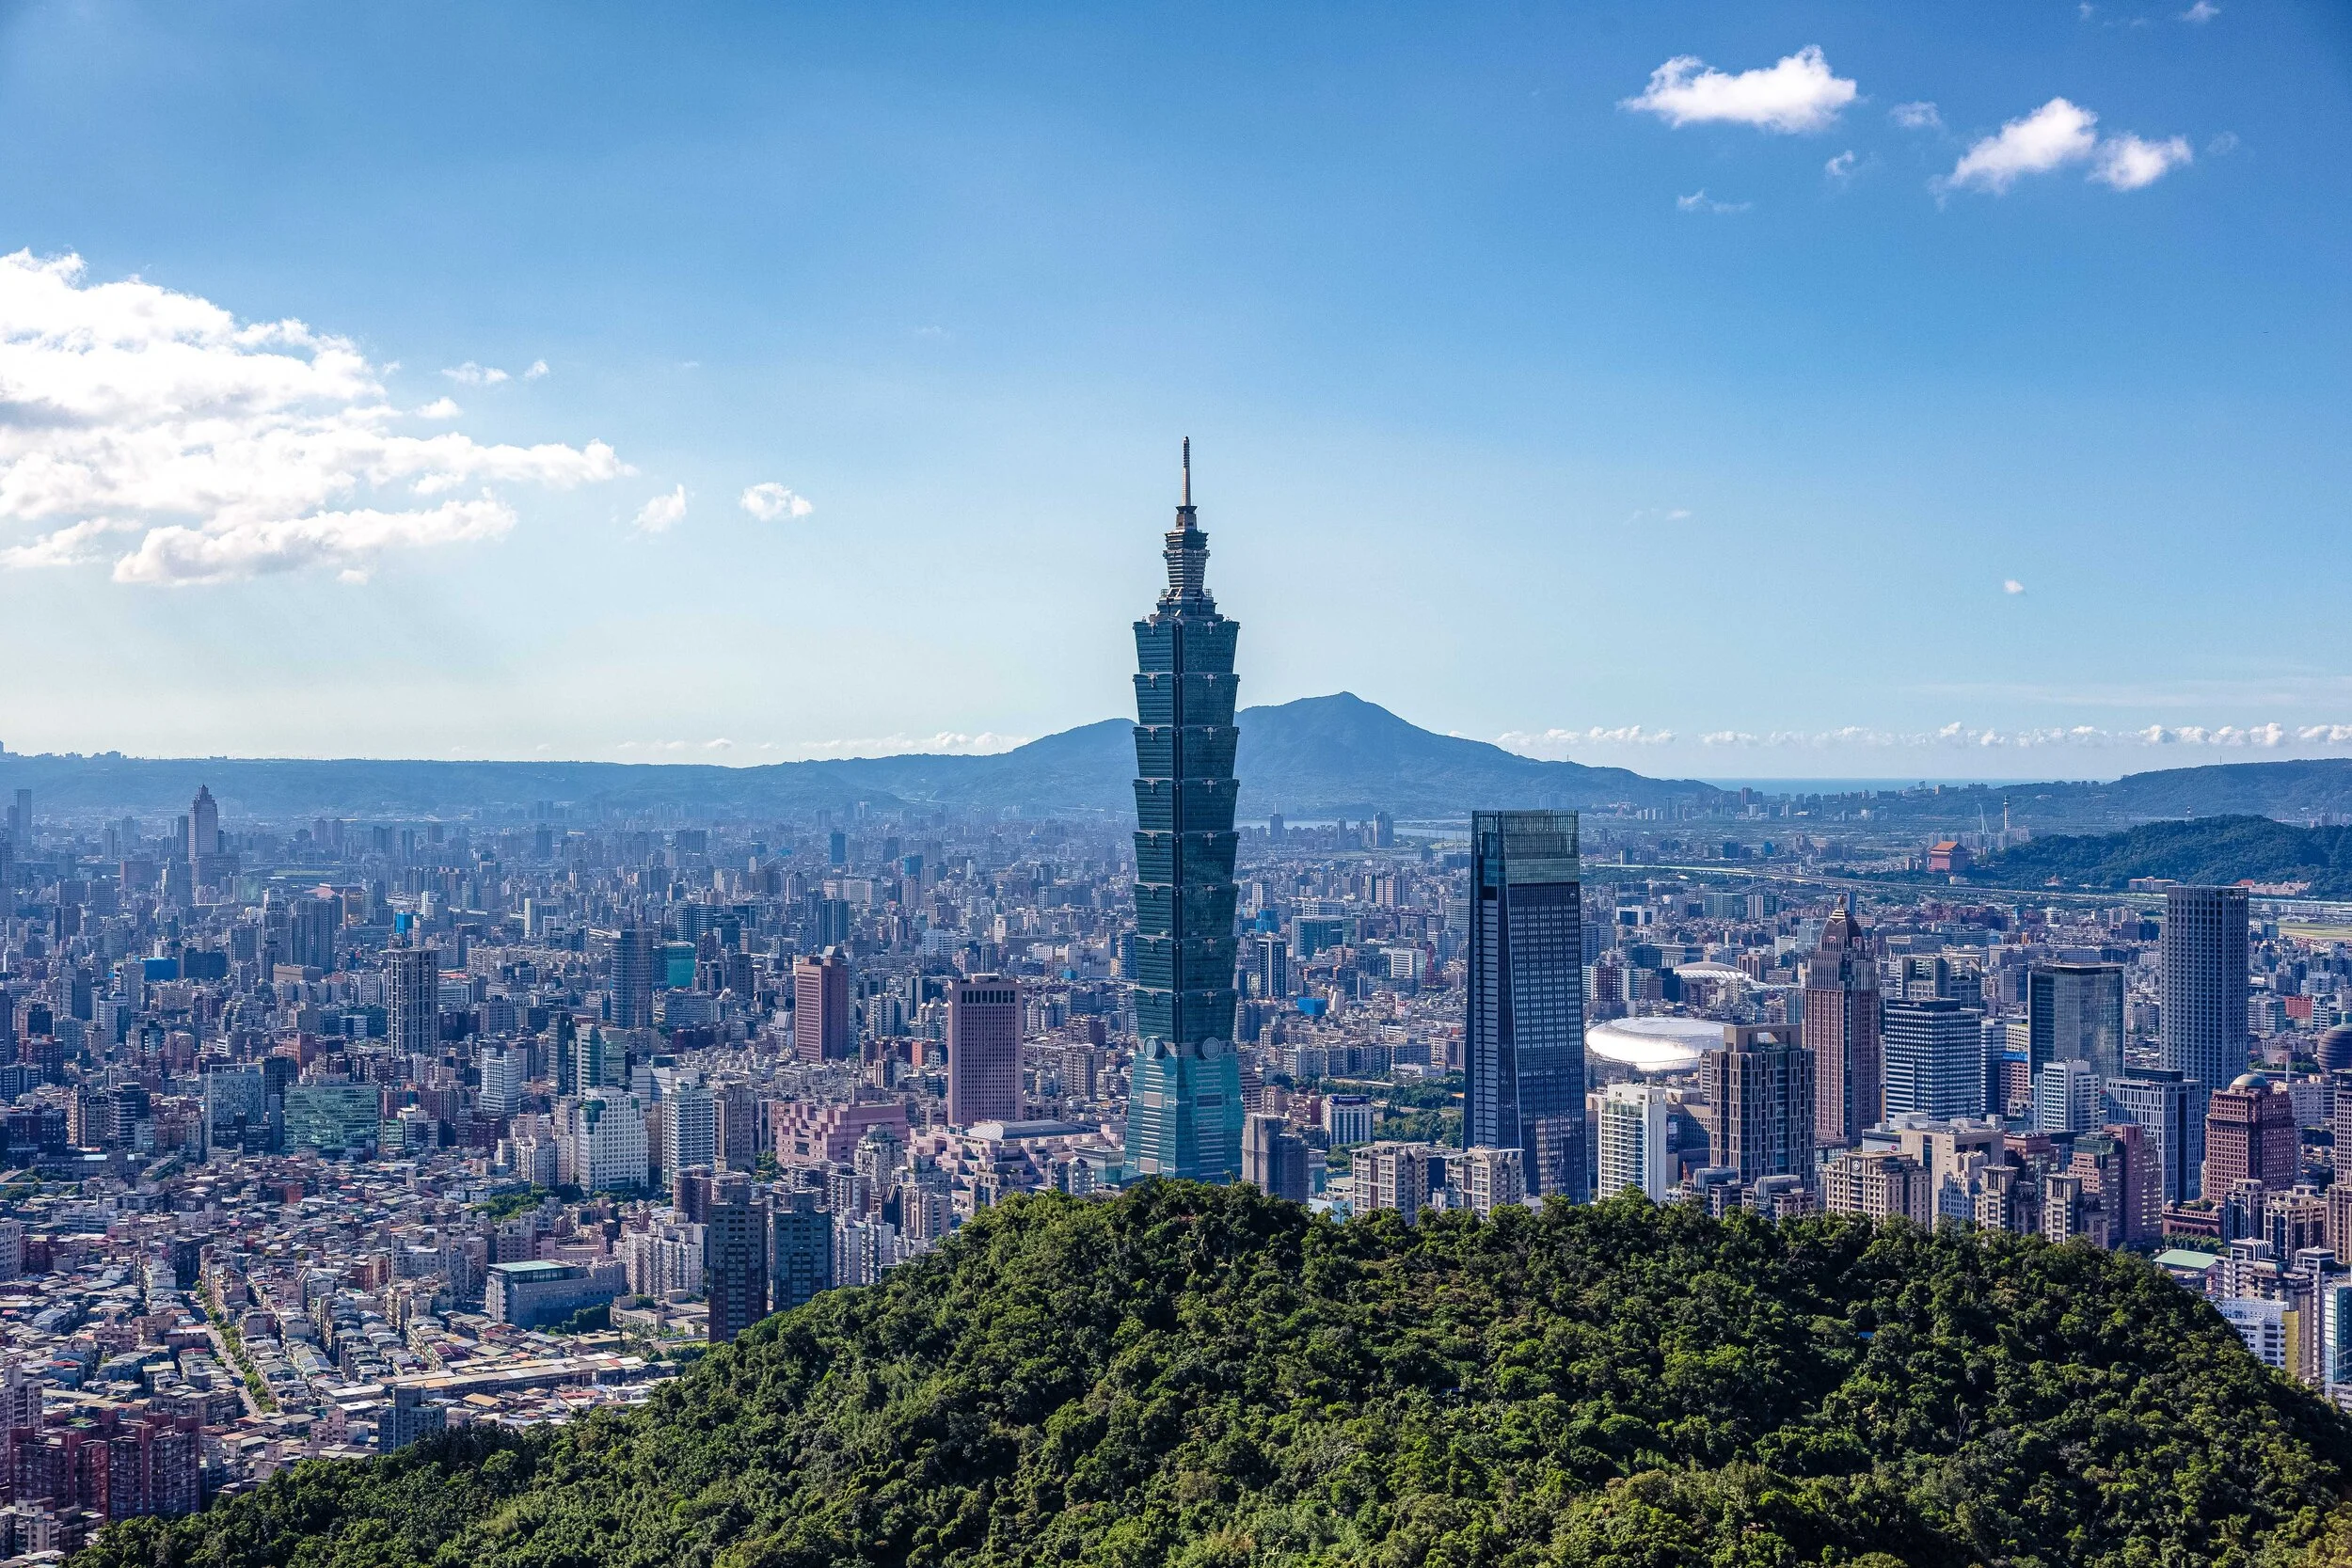
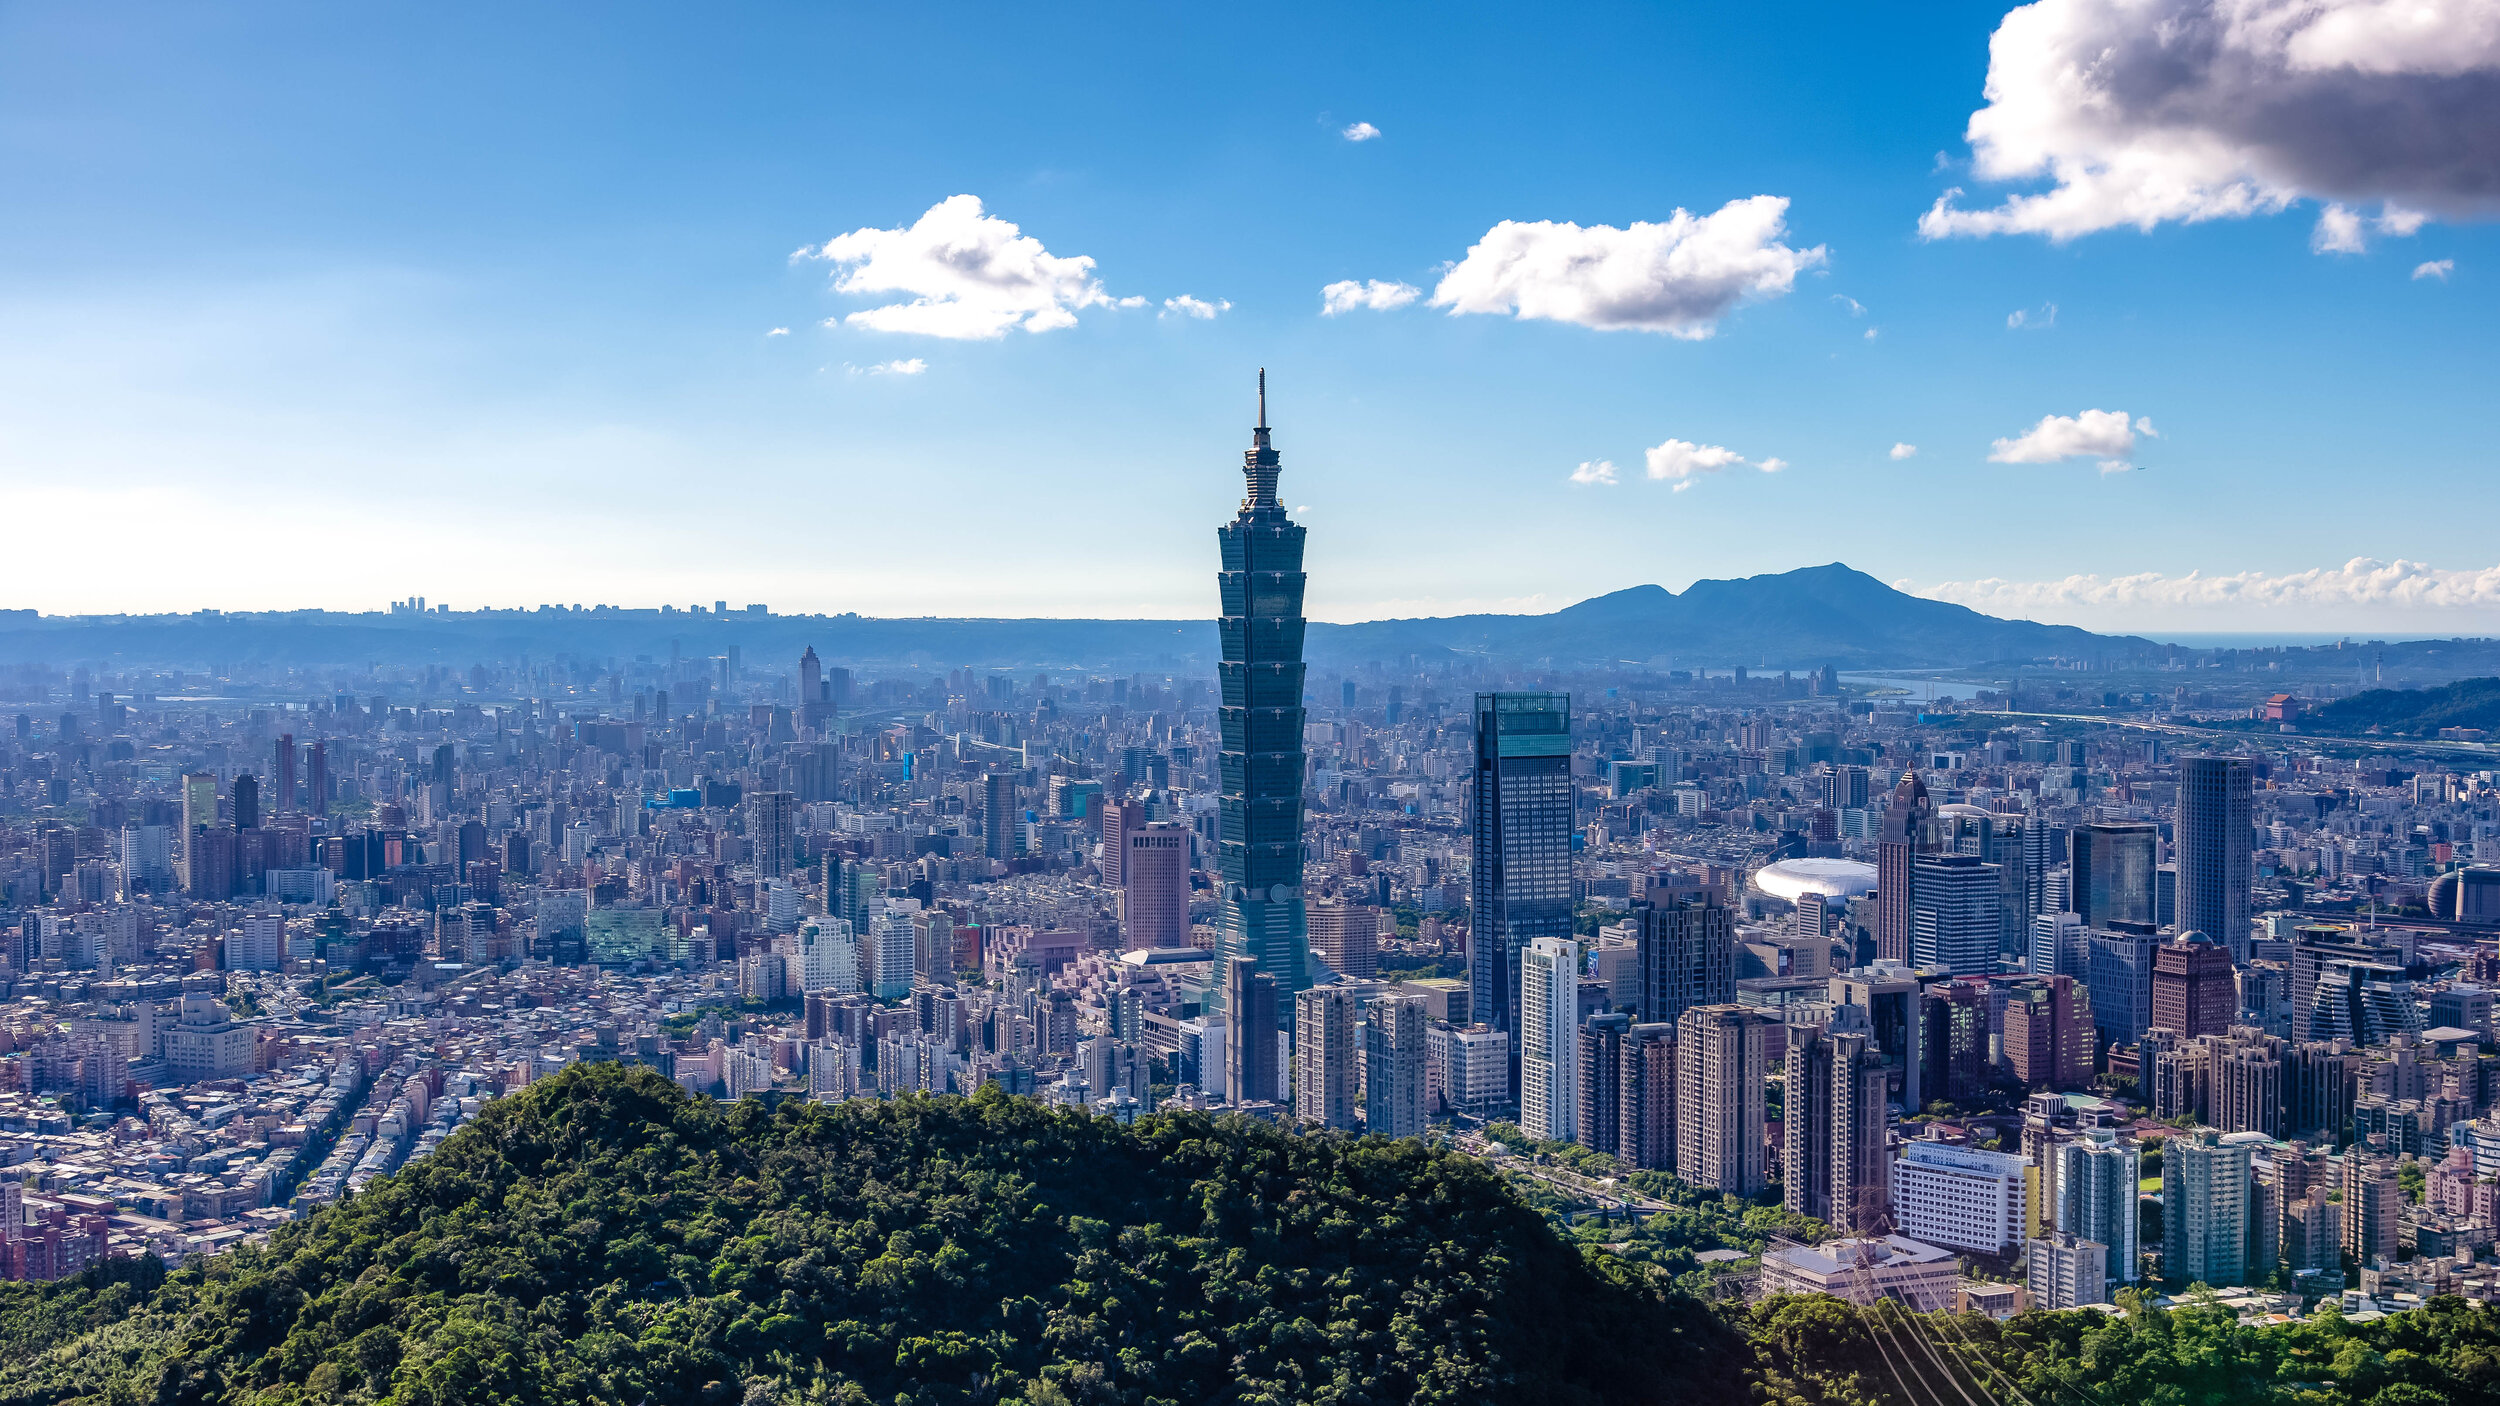
I would contend that one of the best photo locations for a cityscape shop is at the lookout on 9-5 Peak - It gives you the widest perspective of the city that you’re going to get and is an absolutely beautiful spot to enjoy the sunset.

So my advice to you is simple, if you’re going to hike Elephant Mountain and the weather is great, why not take another hour to hike to these two peaks as well? You’re going to enjoy yourself along the path, you’ll get some great photos along the way and you’ll have travelled further than 98% of your fellow tourists.

There’s nothing wrong with taking the road less travelled.


Elephant Mountain (象山步道)

So you’re sitting at your computer, you’re planning a trip to Taiwan and you’re wondering what you’re going to do while you’re here. You type ‘T-a-i-p-e-i’ into Google and what comes up? My bet is that you’re going to get a collection of photos that look more or less the same as the photo above.

This shouldn’t surprise you. 

Taipei is a city with an endless amount of things to see and do - but its fair to say that the undisputed champion of the city’s tourist attractions is the Elephant Mountain Hiking Trail. This is why each and every day hundreds, if not thousands of photos are posted from the many popular photo spots on the trail.

You’re of course welcome to disagree with my assessment, but before you do, I recommend taking some time to hike the mountain and taking note of the amazing mixture of languages being spoken by all of the travelers on the trail. You’re not likely to have an even remotely similar experience anywhere else in Taiwan (at least not in such a high concentration) as you will on Elephant Mountain. 

Even though I’m not a big fan of crowds slowing me down when I’m hiking, I can appreciate the fact that the mountain has become so popular and has played a part in helping so many people from different areas of the world realize that Taiwan is a great place to visit.

It goes without saying that the popularity of the mountain does have its downsides - Namely that it doesn’t matter when you visit, you’re going to be hiking the trail with hundreds of other people. You’re also probably going to have to stand in line at the top to get your cool-looking tourist photo. You’re also going to have to arrive quite early to reserve a spot if you’re wanting to take ‘professional’ style shots of the sunset or the view at night.

If this kind of stuff worries you, never fear, there are quite a few other options for mountain trails in Taipei where you’re able to take beautiful cityscape photos. 

If you’re a short-term visitor though, I can’t recommend enough that you deal with the crowds, hike the mountain and enjoy the experience - I’ve hiked the mountain a hundred times over the years, and even though it has gotten progressively busier, it rarely disappoints. 

Before I start, I’d like to take a minute to explain why I’m writing about this mountain for the second time.

When I first started this blog, I honestly didn’t really have any idea about what direction it would take. I figured I would use it as an outlet to showcase my photography and the beauty of Taiwan, but never could have imagined that it would become such a popular travel resource for people wanting to learn more about Taiwan.

Now that I’m much more experienced with this whole blogging thing, when I look back at some of the articles I wrote when I first started, I feel a bit embarrassed - especially with those that attract a lot of traffic. My Elephant Mountain article in particular is one where I felt like I needed to provide an update and offer much more in-depth information to travelers. 

I hope this updated version helps travelers and answers any questions you may have about hiking this beautiful trail. 

The Elephant Mountain Hiking Trail

Benches designed in the shape of the Chinese characters for Elephant Mountain.

Most tourists seem to be unaware that the Elephant Mountain Hiking Trail (象山登山步道) is essentially just a small section of the much larger network of trails known either as the ‘Four Beasts trail’ (四獸山步道) or the Nangang Mountain Hiking Trail (南港山系). 

The 7km long network of trails also includes Tiger Mountain (虎山), Leopard Mountain (豹山), Lion Mountain (獅山), Thumb Mountain (拇指山), Nangang Mountain (南港山) and 9-5 Peak (九五峰) - all of which provide excellent views of the Taipei cityscape and takes several hours to complete.  

The Elephant Mountain portion of the trail however is just a short hike up a very well-developed set of stairs that should only take you anywhere between fifteen and twenty minutes. Don’t let this fool you though, I’ve seen people showing up in high-heels and their Sunday best thinking that it is going to be quick and easy. 

This mountain trail is steep and even an avid hiker like myself gets a pretty good workout every time I go.

You’re not going to need to wear hiking boots or bring a bunch of gear with you when you go. You’re just going to have to wear comfortable footwear and clothes that are suitable for a bit of exercise.

From the trailhead, you’re going to hike on a very steep incline that will quickly transport you well above the city to a height of about 183 meters (600 feet) above sea level. 

Elephant Mountain Trailhead

The trail is well-developed with a stone path, signage, benches for taking breaks, lights that guide your path at night, water fountains and surprisingly clean washroom facilities. This allows you to not only hike the trail during the day, but also at night without having to worry. 

While there are several cityscape viewing platforms along the way, the main attraction of the trail for most tourists is the area known as the ‘Six Giant Rocks’ (六巨石) near the peak of the mountain. The giant rocks are part of an open space near the peak where you’re going to enjoy the best selfie opportunities, but is also where you’re going to encounter the largest amount of traffic.

Having your photo taken at the rocks is probably the most important part of hiking the trail, so it shouldn’t surprise you that you may end up having to wait in line to get your chance to stand on the rock and take your photos. So if there is a line, its just something that you’re going to have to be patient about if you want to get a photo of yourself.

My advice would be to hike the mountain early in the morning which should save you some time as the mountain isn’t as busy then.

If you’re a solo traveller and are hiking the mountain alone, I recommend requesting a fellow traveller to help you take a photo while standing on the rock rather than simply taking a selfie. If on the other hand you have others traveling with you, you can take turns by having them stand on one of the giant rocks to the rear to take photos of you.

This way you’ll get a bit more perspective when you take your photo and you’ll also save you some time waiting in line if you work together.

Once you’ve finished getting photos at the Giant Rocks area, if you’re not too tired and would like to get some more photos, I recommend continuing your hike a bit further past the Giant Rocks where you’ll come across several other viewing platforms that provide excellent perspectives of the city.

If you hike further up past the rocks, you can choose to complete your hike by returning the way you came, or simply continuing along to Tiger Mountain where you’ll descend upon another MRT station. 

Personally, I prefer to exit through Tiger Mountain for a couple of different reasons - It is a short distance from Elephant Mountain’s final platform, it also allows me to experience another mountain peak, there is less traffic, and more importantly, its much easier on the knees.

How you leave though depends on you, if you missed some platforms on your way up, you’ll probably want to revisit them, so if thats the case you’ll probably just want to head back the way you came.  

Elephant Mountain Photo Spots

Night view of the Taipei cityscape from Elephant Mountain.

When it comes to taking photos of the Taipei cityscape, you’re spoiled for options on Elephant Mountain - There are at least five different vistas for taking photos that provide tourists with an elevated platform giving an even better perspective of the city. 

So when you’re visiting Elephant Mountain, you simply have to ask yourself: What kind of photos do I want to take?

Do you want to take epic travel photos/selfies? Do you want to take professional quality photos of the cityscape? Do you want to take photos of the sunset or the night view? Or are you hoping to get photos of the New Years fireworks? 

Once you’ve decided what you’d like to do, there are a few considerations that you’ll want to keep in mind: 

  1. If you’re hoping to take photos of yourself, you’re probably going to have to wait in line to get up on the giant rock. You should also bring a photo-taking pal who can take turns with you. 

  2. If you’re wanting to take professional quality photos of the cityscape, you’re going to need a camera, possibly a tripod and a spot on one of the platforms where you can set up. 

  3. If you’re hoping to take photos of the sunset, you’re going to have to arrive early, bring a camera and a tripod and wait. Spots on the platforms fill up quickly, so if you don’t want to miss out, you’ll have to arrive several hours early. 

  4. If you’re hoping to take photos of the New Years fireworks, you should probably prepare a tent and camp out for a few days in order to reserve your spot. You may think I’m exaggerating but some of the old guys in Taiwan will have their tripods chained up in spots on the platform several days before New Years and they take turns standing guard. 

Elephant Mountain Photography Platforms

There are a number of platforms and viewpoints located on the mountain where you’re able to take some pretty awesome photos, but even though the signage on the trail is surprisingly helpful, its not easy for tourists to plan their trip in advance with all the scattered information available online.

I’m embedding a map below that includes the location of all the popular photo locations and the routes you’ll take to get there as well as a short description of each of the stops below.

Guide to hiking Taipei's Elephant Mountain (象山) www.goteamjosh.com/blog/xiangshan

  • Photographers Platform (攝手平台)

GTJ-2019-0914-5.jpg

The trail to the ‘Six Giant Rocks’ can more or less be divided into two sections, the first part is a 5-10 minute walk up a very steep set of stairs and the second part is another 5 minute walk up an even steeper set of stairs. Fortunately the space between the two sections is a flat section of trail where you’ll be able to catch your breath and take a break. 

The first viewing platform, the ‘Photographers Platform (攝手平台) sits along this flat piece of land and is an elevated structure that allows hikers the opportunity to take photos of the cityscape. This platform is often full of people so if you want to take photos from here, you’re probably going to have to be patient to get a spot.

Personally I feel like it is a nice spot to stop for a selfie, but its not one of my preferred spots for setting up a tripod and taking photos. I think what this platform does well though is give hikers a pretty good taste of what they’re about to experience as they hike further up the mountain.

  • Fireworks Viewing Platform (煙火平台)

The amazing view of the under-appreciated Fireworks Viewing Platform.

Once you’ve passed the first platform, you have the choice of either hiking up the hill to the ‘Six Giant Rocks’ or continuing straight along the flat path. Most people are going to elect to continue up the hill to their preferred destination, but here is where I’ll let you in on a bit of a secret. If you continue straight along the path, you’re going to find one of the best photo spots on the mountain, the Fireworks Viewing Platform. 

Continuing straight along the flat section of the path you’re going to come upon a covered rest area with public restrooms. What most people don’t realize is that if you keep following the path behind the rest area, you’ll find another trail that will take you to a small platform that has probably one of the best views of the city.

The trail to the platform doesn’t show up on Google Maps, so I’ve drawn a line to it on the map. You’ll see signage along the trail pointing in its direction, but the way they’ve blocked the trail with the rest area confuses a lot of people. Trust me, its there and its awesome!

  • Six Giant Rocks (六巨石)

The view from the popular Six Giant Rocks

The ‘Six Giant Rocks’ area is essentially the main destination for all of the tourists hiking this trail. This is the area where you’re going to get your ‘epic’ Instagram travel photos and also where you’re also going to have to line up with a bunch of fellow travelers all wanting the exact same photo. 

The area is aptly named for the six giant rocks that people climb on to take photos - The first rock you’ll meet as you walk up the stairs, which is coincidentally the smallest of the bunch is the main attraction. People are going to be waiting in line to take turns climbing up to the top of the rock to take their Instagram shots. This is because even though the rock is small, it towers over the peak which provides a unique perspective that makes you seem almost as tall as Taipei 101.

The best way to take photos here is to take turns taking photos with a fellow traveller so if you’re traveling with friends or family, you’re in luck. If you’re traveling solo, you’re going to want to ask another person waiting in line to help you take some photos. Don’t be shy, everyone has come here for the same reason, so make some friends while you’re there.

The reason that you’ll want to have someone else help take your photos is due to the fact that if you simply take a selfie while standing on the rock, you’re not really going to get the full perspective of just how awesome this spot is. If you have someone else helping, they can stand on one of the larger rocks to the real and take wide-angle shots that are so much better.

  • Six Giant Rocks Platform (六巨石觀景台)

Once you’ve finished taking photos at the Six Giant Rocks, you can continue walking along the trail where you’ll very quickly be met with yet another platform for taking photos. The ‘Six Giant Rocks Platform’ is another beautifully constructed elevated platform situated on a cliff and offers some pretty good views of the city. 

The platform has benches, so people like to stop here to enjoy the view and rest a bit. Unfortunately this means that if the mountain is busy on the day that you’re visiting that you’re going to have to wait to get a spot to take photos. 

While I do enjoy taking photos from this location, I don’t think its the best place to set up a tripod to take photos. The reason for this is because when others are walking on the platform, it shakes a bit, so if you’re taking long-exposures, you’re going to have quite a bit of ruined shot. You can however sit your camera on the rail to take some nice photos during the day, especially if you want to take multiple-exposure HDR shots of the cityscape.

  • Chaoran Pavillon (超然亭)

The Chaoran Pavillon is one of the most popular spots for local photographers.

The final photo spot tends to be the most popular one with local photographers, especially with those wanting to take photos of the cityscape at sunset. From the Six Giant Rocks area, it shouldn’t take you any longer than ten minutes to arrive at the pavilion, which thankfully doesn’t require you to walk up any more steep hills. 

While walking along the path you’ll come across a fork in the road with signage pointing that indicates the trail to Thumb Mountain (拇指山) is to the right and to the left you’ll find the pavilion. From there you’ll only have to walk for a minute or two before you arrive. 

The view from the pavilion is beautiful, but spaces fill up quickly, especially before sunset, so if you’re wanting to set up a tripod to take some cityscape photos, or night shots, you’ll probably want to arrive quite early to make sure you get a spot. 

Getting There 

In the past, hikers would have to walk from Xinyi District toward the mountain and (if they were anything like me) would invariably get lost or have to ask directions. All of those problems have been solved thanks to the addition of an MRT station near the trailhead. You can of course still walk to the mountain from the Xinyi area, but the easiest way to get there is by taking the Red Line (紅線) to Xiangshan Station (象山捷運站) and from there walking the short distance to the trailhead.

Something you’ll want to keep in mind is that not all trains go to Xiangshan Station as quite a few end their service at Da’an Station (大安站). Before getting on the train, make sure that it is one that goes all the way to Xiangshan, which is currently the terminal station for the red line.

Once you’ve reached the MRT station, take Exit 2 and walk through Xiangshan Park (象山公園) until you reach the end of the road. From there you’ll see signs directing you to turn left. When you’ve reached the top of the hill you’ll turn right and within a minute or two will arrive at the trailhead which is next to a temple.

If you want to grab some water or a snack before your hike, you’ll find a 7-11 and a Family Mart a short distance away from the park. Before you turn left to walk up the hill, turn right and walk down Xinyi Road to get to the convenience stores.

If you find yourself in the Xinyi (信義) area, you could also just as easily hop on a Youbike, ride to Xiangshan Park and then follow the directions above. 

Likewise, Xiangshan Station is serviced by buses 20, 32, 33, 37, 46, 88, 207, 612 and Red 10. 

If you want to take a bus and need info on bus stops or real time info, check the Taipei eBus website for more information. You may also want to download the “台北等公車” smart phone app which uses GPS to let you map your route more easily.  

While you’re in Taipei, there is certainly a lot for you to see and do, I’d suggest though that Elephant Mountain should be at the top of your list - Not only does it have arguably the best views in the city, it is also a quick and easy hike and is extremely accessible. You can also get some pretty epic travel photos while you’re there and best of all - its completely free. If you’re visiting Taipei and you’re not planning to visit the mountain, you’re certainly missing out on a great experience.


The Quiraing

If you’re an avid hiker, a trip to Scotland won’t disappoint - The country is highly regarded for its rugged mountainous landscapes and it seems that no matter where you are, you’re never far from a breathtaking trail. Even if you’re just hanging out in the capital city of Edinburgh, you can easily hike to the top of a couple of mountains that provide some really great views of the historic cityscape.

Scotland’s mountainous landscapes however are considerably more enjoyable the further you travel north - The sparsely populated Scottish Highlands for example, with boundaries that lie north-west of cities Glasgow, Stirling and Dundee, is an area considered by many to be the cultural heartland of the country and is home to several high mountains, including Ben Nevis, the highest mountain peak in the United Kingdom.

The Highlands are highly regarded for the well-maintained hiking trails, big open skies, whisky distilleries and the amazing people who live there. In fact, tourism figures indicate that over 95% of the foreign tourists who visit Scotland come for the hiking, with well over a million people trekking through the Highlands each year.

With around three-hundred ‘munros’ (mountain peaks) reaching over 3,000 ft, locals in Scotland have taken to referring to these adventurous tourists as ‘Munro Baggers’, which is a shout out to Sir High T Munro, who surveyed and catalogued all of them and started what would be the ultimate Scottish challenge - climbing all of them! 

Link: Scottish Munros and Munro Bagging (Visit Scotland)

If you’ve been considering a trip to Scotland, it’s likely that you’ll have noticed that one of the most common and iconic images of the area isn’t of a peak Ben Nevis or Ben Lomond - they are almost always of the breathtaking landscape of ‘the Quiraing’ on the Isle of Skye.

The Quiraing, which is considered to be Scotland’s premiere mountain hike is one that attracts tourists of all varieties as the experience of hiking the rugged, yet amazingly beautiful trail is one of the best experiences one can have while hiking in Scotland.

Coincidentally it is also the reason why the quiet Isle of Skye has become one of the world’s most popular tourist destinations in recent years.

The Quiraing

The Quiraing, or ‘A' Chuith-Raing’ in Scottish Gaelic is a popular hiking trail along the Isle of Skye’s northernmost Trotternish peninsula. The name ‘Quiraing’ 「KWIR-AN」can be a bit of a tongue-twister for most peoe to pronounce, but don’t worry if you make a mistake, the locals living on the Isle of Skye have heard it all and are happy to indulge you.

The Gaelic name for the ‘Quiraing’ actually originated from the Old Norse words 'Kví Rand' which loosely translates as “Round Fold” referring to the shape of the trail that reaches around the mountain. Historically the trail formed something of a protective barrier which local farmers used to their advantage to conceal their livestock from Viking raiders.

Today you won’t find many cows grazing along the trails, but you are likely to come across quite a few more mountain goats than you will people scattered throughout the trail. Fortunately they’re rather indifferent to your presence and they’re quite well-behaved.

The geologically significant Trotternish Ridge was formed during the glacial age due to a great landslip that occurred in the area. To explain things a bit more scientifically, basically what happened is that gravity forced the much heavier layers of volcanic rock in the area to collapse and dislodge the weaker underlying layers of sedimentary rock forcing a massive landslide.

The landslide, the largest of its kind in the UKs history was responsible for shaping the 19 mile long ridge and created not only the breathtakingly beautiful Quiraing but also the “Old Man of Storr”, another popular tourist destination.

The Quiraing area though stands apart from the rest of the ridge due to the fact that it is the only area that continues to remain geologically active. The landscape is in a constant state of motion and shifts at least a few centimetres each year requiring the roads to have to be repaired on a yearly basis. The result of this constant state of geological motion is breathtaking scenery, jagged rock formations, rolling hills, mountainous lakes and valleys that create a rich tapestry of some of the best landscapes this planet has to offer.

The Hike

So, how do you go about hiking one of Scotlands most iconic trails? Is it going to be difficult? Is it going to take a lot of time? Do you need to be an experienced hiker?

Let me answer those questions quickly: No, No and No.

Once you’ve gotten yourself to the parking lot, what you hike is up to you, how much you’re willing to walk and most importantly, the weather.

The full circuit hike that brings you from the parking lot, all the way around the mountain and back is about 6km in length. Most people however don’t elect to hike that far and instead prefer to walk far enough to get some nice photos and then heading back the way they came.

If you don’t plan on hiking the full loop, you don’t really have to prepare very much other than a camera and your smile. The trail along the mountainside is quite safe and doesn’t require much hiking skill or experience. You can walk as far as you like and then turn around when you think you’ve seen enough.

If on the other hand you plan to do the entire circuit, you’re going to have to prepare some water, snacks, proper footwear and (depending on the season) proper clothing. The full circuit starts out relatively easy, but becomes slightly more difficult once you’re halfway through.

Needless to say, if you’re not a fan of heights, this one probably isn’t for you.

The first portion of the hike follows a well-worn path along the mountain and provides an excellent opportunity for photos of the various crags, lochs and valleys below as well as Rona and Raasay islands in the distance.

the-quiraing-map-1300-7-.jpg

Once you start rounding the cliff, the view starts to change and the level of difficultly starts to increase as well. From this point on, you’re going to be walking mostly up hill with views of the northern coast until you reach the top and start walking down the other side of the mountain to the parking lot.

Even though hiking the full circuit is considered moderately difficult, you’re going to be glad that you made the effort as the upper portion of the mountain affords the most beautiful views of the Quiraing. You’ll also be able to enjoy 360 degree views of the entire northern coast of the Isle of Skye and the Scottish mainland in the distance.

If you hike the entire loop, local estimates indicate that the entire hike should take about two hours to complete - I can assure you though that you’re going to stop on numerous occasions to enjoy the scenery. The number of times you stop in addition to the amount of traffic on the trail are going to be factors in how long it takes you to complete the hike.

So if you really want to enjoy the beauty of the Quiraing, I’d suggest that you prepare for at least 3-4 hours.

I hope that if you’ve read this far, that you’re also able to learn from my failures.

I screwed up when I hiked the Quiraing and I’m a bit ashamed to admit it.

My first failure wasn’t really any fault of my own - The day that I had set aside for hiking the Quiraing fell on a day when the weather was absolutely horrid. We drove up the mountain, parked the car and there was nothing but thick fog, making the trail pretty much impossible to hike (or enjoy).

My second failure was caused by a lack of preparation - I didn’t do enough research into the trails to know how to complete the entire loop. I had assumed that the trail would be well marked and easy route to follow. Unfortunately when we had completed about 75% of the trail, we started feeling like we were lost and were worried that we would lose our light, so we decided to turn around and head back the way we came.

Even though the trails are for the most part well-developed, there aren’t any markers that indicate the direction you should be headed in. Once you round the cliff, the trail starts to become a bit less worn, harder to follow and you’ll come across fewer people. In fact, on the day we were hiking, we were the only people who were hiking the entire circuit, so once we started walking up the cliff face, we were completely alone.

I attempted to consult Google Maps and GPS coordinates while on the trail, but the lack of internet connection in the area became an issue. So, after walking up the cliff face and having no idea how to get back on the trail, we decided to turn around and head back the way we came, which was really unfortunate.

Considering the lack of markers along the trail, you may find yourself in a similar situation, so it is important that you familiarize yourself with the route before you attempt to hike the circuit.

Below is a map of the Quiraing walking route that you can save to your Google Maps.

Link: Stages of the Quiraing Hike (Isle of skye.com)

Getting There


Address: Quiraing, Portree IV51 9LA, Scotland

GPS: (57.6301177, -6.2781544)

Getting to the Quiraing is going to require a bit of effort on your part - Whether you’re travelling directly from Edinburgh, Glasgow or Inverness, you’re going to have to endure the terrible task of driving through several hours of the most scenic roads imaginable.

Sounds tough, right?

The reality of the situation is that if you really want to make the most of your Isle of Skye trip, you’re going to have to rent a car. Even though its possible to take a train and then hopping on a bus that will take you the island, once you’re there you’ll have trouble getting around if you’re relying solely on public transportation.

My Isle of Skye itinerary was an action-packed week of touring the island that would have been impossible to complete without a car, so I can’t stress it enough that if you really want to enjoy the beauty of Skye, you’re going to need your own wheels to get around.

Starting your journey to Skye from Glasgow is probably your best bet as you can easily get there by air or railway. The city is about a 216 mile drive away from the island and offers a multitude of options for car rental services, giving tourists the opportunity to shop around and find the right rental to fit your needs and your budget.

From Glasgow, you’ll make your way around the beautiful Loch Lomond and shortly after you’ll find yourself driving through the Highlands. The drive from there becomes quite simple but you’ll likely want to stop several times to take a break, take some photos or get some food.

One of those stops comes just before you reach the bridge that takes you from the mainland to the Isle of Skye. The picturesque Eileen Donan Castle has become a must visit location for any traveller visiting the area and is a welcome stop after driving through the mountains.

A rare photo of a Josh in the wild.

Once you’ve taken the bridge to Skye, you’ll follow the A87 highway all the way to Portree and then switch to the A855 which will take you up the north-eastern coast of the island. Upon reaching the small village of Staffin you’ll have to start paying attention to signage on the road that will indicate where you’ll make a turn that will bring you up the mountainous road to the Quiraing parking lot.

It is important to note that the road to the Quiraing isn’t the best - Its narrow, its steep, it is often in bad shape and in the peak tourist season, it is jam-packed with traffic. You need to be very careful while driving up and down the road and you’ll also have to be considerate of other drivers making sure that you yield to them allowing them to pass by instead of creating a situation where traffic is stopped completely.

The parking lot is free of charge and is quite large, but during the summer months, it can be quite busy. If you arrive at the parking lot and discover that it is completely full, it is important to remember that you absolutely must not park on the side of the road that takes you up the hill. Not only is it dangerous, it will cause traffic disruptions. 

If you aren’t driving a car, there is an infrequent bus service that will transport you from Portree to Staffin, but once you’ve arrived there you’ll have to walk several kilometres up the road to get to the trailhead. Once you’ve finished hiking, it is likely that you’ll have to wait a long time for a bus that may or may not come. From what I’ve seen, the buses on the island aren’t really to be trusted, so if you do elect to take the public transportation route, you may find yourself stranded, so be sure to have the number of a taxi company handy.

If you prefer to use public transportation, the link below will give you a better idea of what’s available and how to better plan your trip.

Link: Travel Tips (Isle of skye.com)

In recent years the Isle of Skye has been overrun by tourists - so much that the local infrastructure has been stretched to its limits and most landowners are becoming AirBnBs hosts or converting their property into private lodges. This has had an adverse effect on the local economy with many local residents of Skye unable to purchase their own homes or finding a place to stay.

While there are arguments with regard to the sustainability of the tourism industry on the island, it is important to remember when planning your trip that travelling to the Isle of Skye is not going to be cheap due to demand and a lack of places to stay.

The reward though, for those willing to travel the long distance to the island and pay the high prices for room and board is spectacular scenery and memories that will last a lifetime.

If you travel to Skye, this trail is likely going to be your number one destination, so I don’t need to tell you how much I recommend visiting. Make sure though that you take some time to hike the full circuit and enjoy the spectacular scenery. You won’t regret it.